
It was my turn to choose what we were going to do this week for Martha Mondays crayon hearts. I wanted to do a Valentine craft, and Brette of Martha and Me had already done my first choice, the glittered roses. I thought this one was pretty and easy enough for everyone to try. I also chose to post it here rather than my food blog, just because of it being a craft instead of cooking. My other cooking Martha Mondays I'll post on The Tiny Skillet sorry to confuse anyone. So here we go! It seemed easy enough, and I had all the stuff on hand to do it. You take some wax paper and spread some crayon shavings on it, fold it over and crimp the edges. After protecting your ironing board, and iron with craft paper, simply go over it with an iron set on medium, melting the shavings.
  Okay, again easy enough. The first sign of difficulty was finding a sharpener that would fit the crayon, the first one was too snug. Then the points kept getting stuck in the sharpener. I thought of shaving them a different way, but I used a tooth pick to keep getting tips out that broke off and stuck in the sharpener. I think I might of had too old of crayons.
 It said not to overlap them, yeah, right! I spread them thin hoping it wasn't too thin. I remember ironing Fall leaves between two sheets of wax paper as a kid. They didn't always turn out like the teacher's did either.
 So why did it get those wrinkles? Humm...I was able to get a couple hearts cut out, but it was had tracing around the heart, nothing would show up so I used a red sharpie! They looked okay...but not what I expected it sorta curled and so I peeled it apart...then it curled and so I just ironed it on craft paper. There!
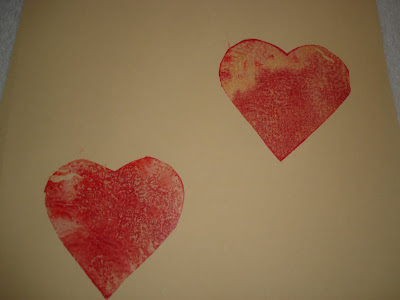 But then it didn't give you the see through hang it in the window look they were going for! It did look cool on the paper and would make a great Valentine's Day card!
 I'll have to cut some more out to use for some cards! ...and I got some really sharp crayons out of it!
 I don't know, maybe I should try shaving it different or adding a thicker layer, maybe next time, it was kinda messy with the shavings all over! I am curious how everyone else's turned out. So please check out theirs off the Martha Mondays blog list.
 Laying down while he's eating!
 Well after all he is almost 14 years old. You know how old that is in dog years!
 It seemed easy enough, and I had all the stuff on hand to do it. You take some wax paper and spread some crayon shavings on it, fold it over and crimp the edges. After protecting your ironing board, and iron with craft paper, simply go over it with an iron set on medium, melting the shavings.
  Okay, again easy enough. The first sign of difficulty was finding a sharpener that would fit the crayon, the first one was too snug. Then the points kept getting stuck in the sharpener. I thought of shaving them a different way, but I used a tooth pick to keep getting tips out that broke off and stuck in the sharpener. I think I might of had too old of crayons.
 It said not to overlap them, yeah, right! I spread them thin hoping it wasn't too thin. I remember ironing Fall leaves between two sheets of wax paper as a kid. They didn't always turn out like the teacher's did either.
 So why did it get those wrinkles? Humm...I was able to get a couple hearts cut out, but it was had tracing around the heart, nothing would show up so I used a red sharpie! They looked okay...but not what I expected it sorta curled and so I peeled it apart...then it curled and so I just ironed it on craft paper. There!
 But then it didn't give you the see through hang it in the window look they were going for! It did look cool on the paper and would make a great Valentine's Day card!
 I'll have to cut some more out to use for some cards! ...and I got some really sharp crayons out of it!
 I don't know, maybe I should try shaving it different or adding a thicker layer, maybe next time, it was kinda messy with the shavings all over! I am curious how everyone else's turned out. So please check out theirs off the Martha Mondays blog list.
So this is what Tucker was doing while I was crafting. Talk about a lazy dog!
 Laying down while he's eating!
 Well after all he is almost 14 years old. You know how old that is in dog years!
Hope you all have a great week!


 I also just put glittered sea urchin shells over my tiny glob lights on my tree. The natural design of the shells are beautiful by themselves.




 Posts
Posts


